Blink LED / 閃爍 LED 通常是初學者的第一個應用,其實即使是老手在拿到未曾使用過的 MCU 或是新板子時也會從這裡開始。通常會先了解基本的 I/O 驅動能力 及 I/O 在 Timing 的表現如何。所以, 這個是常用的例子。
I/O 輸出有分兩種方式, Sink current 及 Source current 。區別是 電流流動方向的不同,Sink current 是電源電流經過負載流向 MCU, Source current 是MCU 輸出電流經過負載流向接地。需要注意地方是兩者的邏輯剛好是相反。
Sink Current:
Source Current:
在這裡只要注意官方的參數。 官方的建議是 電流均不要超過 20 mA (UNO 版本),如果預期可能超出的情況則會需要連接 Driver 輸出電路。
在 Arduino 裡,通常我們會使用 File / Examples / 01.Basics / Blink 做為範本,當中會使用 delay() 函式做為延遲的主要方法。delay() 的特性是停止一段時間不做任何事,然後時間到之後就繼續走。如果電路的控制項目不多,使用 delay() 倒是沒甚麼大問題。但如果同時有其他不同應用的 I/O 時就不太適用了,例如,當有 INPUT (按鍵) / OUTPUT (LED) 同時應用時,會遇到跳過按鍵有時沒反應的問題,就是因為 delay() 剛好跳過 INPUT 的程式段。
int ledPin = 13;

void setup() {
  pinMode(ledPin, OUTPUT); //將 pin 13設定輸出模式
}

void loop() {
  digitalWrite(ledPin, HIGH);
  delay(1000);       //延遲 1 秒
  digitalWrite(ledPin, LOW);
  delay(1000);       //延遲 1 秒
}
我們可以使用 File / Examples / 02.Digital / BlinkWithoutDelay 的範例,可能在思路上可能會不習慣。但在基礎邏輯上會很有幫助。尤其在中大型的 Project 時,會需要使用類似的方法。
所需材料
- Arduino UNO x 1
- 電阻: 330 ohm x 1
- 麵包板 x 1
參考連接
程式碼
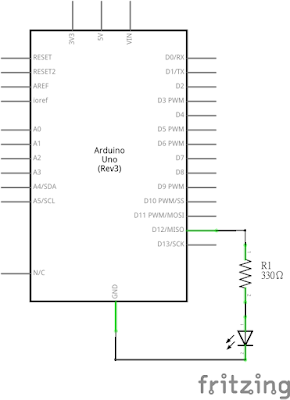
採 Source current 連接LED 及 連接 Arduino UNO 的 PIN 12 腳位
/*const 常數 */
/* I/O Pin 選擇使用 12*/
const int ledPin = 12;
/*間隔 1000ms / 1秒*/
const long interval = 1000;
/*LED I/O 狀態,等於是 ledPin 的I/O狀態*/
int ledState = LOW;

/*儲存下次的 clock cycle 時間*/
unsigned long previousMillis = 0;


void setup() {
  // put your setup code here, to run once:

  pinMode(ledPin,OUTPUT);
}

void loop() {
  // put your main code here, to run repeatedly:

  //儲存目前的 clock cycle 時間
  unsigned long currentMillis = millis();

  //確認是否已經到預期時間
  if(currentMillis - previousMillis >= interval ){
    /*儲存下次的 clock cycle 時間*/
     previousMillis = currentMillis;

     ledState == LOW ? ledState = HIGH : ledState = LOW;

     digitalWrite(ledPin,ledState);
  }
}


0 comments:
發佈留言